
How to add paid TTS donations to OBS.
October 30, 2026
Checked with OBS Studio 33 in October 2026. TTS.fish is our product; this guide uses it.
Paid TTS has two parts in OBS: the audio your viewers hear, and optionally something on screen that shows messages and tells people how to send their own. This guide sets up both with TTS.fish. It takes about ten minutes, including Stripe onboarding. For platform-specific tips, see the guides for Kick and Twitch.
Before you start
- Create a TTS.fish account and confirm your email. Your username becomes your link, tts.fish/your_name.
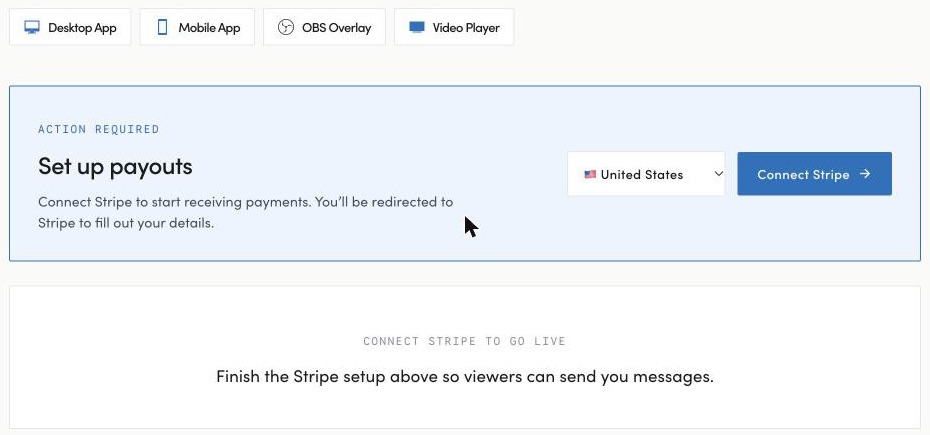
- Connect Stripe so you can get paid. You don’t need a Stripe account first: TTS.fish sets one up for you. Onboarding usually takes a few minutes; have your ID and bank details ready.
- Set a price and choose which voices viewers can use.
Step 1: Start the player
Pick one of two ways to play messages:
- Browser player. Log in, open your own tts.fish page (the Playback tab), and click Start Listening. That tab is your player: keep it open while you stream. Nothing to install.
- Desktop app. A tray app for Windows, macOS, and Linux that does the same job without a browser tab.
Viewers can only send messages while you’re listening. If you close the browser tab, your page stops taking messages about 30 seconds later.
Both players let you choose the output device messages play on (in the browser, that needs Chrome or Edge). Sending TTS to a spare or virtual audio device, such as VB-CABLE on Windows or BlackHole on macOS, gives it its own channel in OBS.
Step 2: Capture the audio in OBS
- Simplest:desktop audio. On Windows and Linux, OBS’s Desktop Audio picks it up by default. On macOS 13 or later, add a macOS Audio Capture source set to capture desktop audio.
- TTS on its own fader: capture just the browser or the desktop app. Use an Application Audio Capture source on Windows 10 (version 2004 or later) or 11, or a macOS Audio Capture source set to one application on macOS 13 or later. Linux needs the third-party PipeWire audio capture plugin. Capturing a browser includes all of its tabs, and you should turn off Desktop Audio in OBS so TTS isn’t captured twice.
- Dedicated device: if you sent TTS to a virtual device in step 1, add that device to OBS as an Audio Input Capture source.
Step 3: Add the overlay
The overlay is a page you add to your scene as an OBS browser source. It shows each TTS message once it has played, with the sender’s first name, plus a QR code viewers can scan to send their own and, optionally, your tts.fish link.
- On a computer, open your Playback page and click OBS Overlay. Choose a horizontal or vertical layout, a dark or light theme, and the size, then copy the URL.
- In OBS, add a new Browser source to your scene and paste the URL.
- Set the width and height to the values the OBS Overlay dialog shows, and uncheck Shutdown source when not visible.
- Position it on your scene.
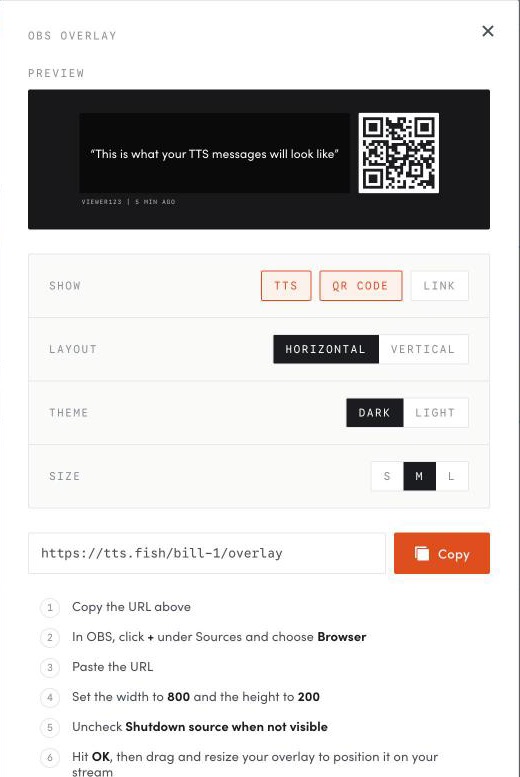
The overlay is visual only. Audio still comes from the player in step 1.
Step 4: Tell chat how to send a message
Viewers don’t need an account or an app. They open your link or scan the QR code, type a message, pick a voice, and pay with Stripe. Put the link in your chat bot, your panels or bio, and your socials, and leave the QR code on screen for viewers watching on a computer or TV.
Test it before you go live
During account setup, use Test TTS on your Playback page to check message generation and playback without a card. You can also use Test sound while listening to check your audio output. Open your public link in a private window to check that the send form is available. Don’t make live payments solely to test: Stripe’s testing rules don’t allow real cards in live mode.
While you’re in Settings, add blocked words under Moderation and decide under Channels whether to turn on auto-approve. Until you do, every message waits for your approval. Our guide on stopping TTS trolls covers those settings.